You can get Oooh Shiny Scrapkit from Sarah at http://hungryhill-sarah.blogspot.com/
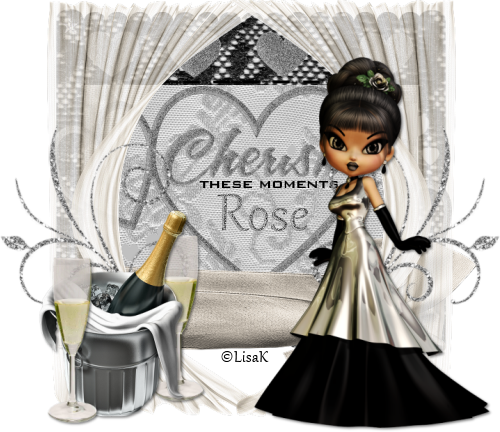
Cherish Template from Kittz Here
The tube was in the kit
Open Cherish template by kittz>shift+D>close out original
Delete TOU and Raster 1
Click on Scalloped Hearts2 Layer
Selections>Select all>float>defloat
Open paper 4>copy and paste as new layer
Selections>Invert>Delete>deselect
Delete Scalloped Hearts2
Click on Scalloped Hearts1 Layer
Selections>Select all>float>defloat
Open paper 4>copy and paste as new layer
Selections>Invert>Delete>deselect
Delete Scalloped Hearts1
Do the same for Round Edge Rectangle 1&2 as you did for Scalloped Hearts1&2
Click on Large Rectangle Shape
Selections>select all>float>defloat
Open paper 5>copy and paste as new layer
Image>Resize 60%
Selections>invert>delete>deselect
Slide transparency of this level to 50% then delete large rectangle shape
On raster 5 selections>select all>float>defloat
New raster layer>flood fill this with white>deselect
Move this layer under raster 5
Image>canvas size>800x800
open sheer-drape-2>copy and paste as new layer>move this layer to the top
move curtain to the left
Duplicate>mirror (look at my tag for placement)
open doodle-1>copy and paste as new layer>move doodle to bottom right
image>resize 60%>duplicate and mirror
open wrap-1>copy and paste as new layer>use ribbon to cover bottom of template
Move this layer to were it sits under raster 7
Click on cherish word art layer>with magic wand select the word cherish
Flood fill with #727272
adjust>add/remove noise>add noise with these settings
Gaussian checked
monochrome checked
noise 44%
Effects>plugins>eye candy 5 impact>bevel
These settings:
Basic tab:
bevel width: 29.39
bevel height:18
smoothness:10.22
round corners:0
bevel placement:inside selection
darken deep areas:0
Shade interior:checked
Lighting tab:
Direction: 207
Inclination: 60
highlight brigtness: 51
highlight size: 65
highlight color: #727272
shadow color: #d2d2d2
Hit ok then deselect
Open SSLisa-Cookie-ooh shiny-black 1
Take your lasso tool and circle lisa k copyright hit delete
(we will be adding this again later)
Copy and paste tube as new layer>drag this layer to the top
Image>resize by 50% then again by 70%
Add a drop shadow these setting:
Vertical:2
Horizontal: 2
Opacity: 50
Blur: 5
Color: Black
Select Heart Frames Layer
Selections>select all>float>defloat
Flood Fill with #727272
Add noise (same setting as before)
Effects>plugins>eye candy 5 impact>bevel (same settings as before)
Deselect and then move the hearts a little down (look at my tag for reference)
click on raster 10
Open bubbly>copy and paste as new layer>move to the bottom left
image>resize 50%
Open bubbly glass>copy and paste as new layer
move to left of bubbly image>resize by 50% then 80%>duplicate>mirror>move image to right of bubbly image
move this layer to where it's sitting under bubbly layer
Add drop shadow to all 3 images
Click on Raster 1 and with magic wand select inside each heart
add new layer>selections>modify>expand by 2
Flood fill with #727272>adjust>add/remove noise>add noise (same settings as before)
effects>plugins>eye candy 5 impact>bevel (same settings as before)>deselect
move this layer to where it's sitting under raster 1
Before adding name and copyright I like to crop and resize
Add your name and copyright info